文章来源:郭霞
1. 项目简介
飞腾派开发板搭载异构系统级芯片(SoC),基于 ARMV8 架构,集成四核处理器(2×FTC664@1.8GHz + 2×FTC310@1.5GHz)。非对称多处理(AMP)系统要求支持同一芯片上多操作系统环境并行运行,OpenAMP 通过标准化共享内存方案,为异构多处理应用提供多核并行性利用能力,简化 SoC 协同机制。
《飞腾派部署 openAMP》系列将分两期发布,采用 “主核 Linux 系统 + 从核裸机系统” 的 openAMP 拓扑架构:
u 第一期《PIOSv2.1 部署与 AMP 启动》:阐述飞腾派基础操作系统 Phytium-Pi-OSv2.1(简称 PIOSv2.1)的部署流程,以及 Phytium-openAMP 的集成方法,实现主从核协同的 AMP 拓扑。
u 第二期《基于 Phytium-openAMP框架从核 GPIO 驱动》:基于首期构建的 OpenAMP 环境,实现并演示从核通过 OpenAMP 机制实现 GPIO 外设驱动的应用实例。
2. 项目准备
硬件规格:飞腾派
软件要求: 开发环境ubuntu22.04
3. 交叉编译PIOSv2.1
(1) 开发环境搭建
a) 操作系统ubuntu22.04
Note:编译过程需要的空间比较大,建议60G。
b)系统工具安装
sudo apt update
sudo apt install build-essential git  debootstrap qemu-user-static   binfmt-support debian-archive-keyring  eatmydata libncurses5-dev libncursesw5-dev
(2) 源代码获取
a)git clone
sudo git clone  --depth 1 --branch phytiumpios-v2.1 https://gitee.com/phytium_embedded/phytium-pi-os.git  //clone代码
sudo git describe --tags --exact-match   //检查代码的tag是否正确
b)更换apt的source
sudo cd phytium-pi-os/board/phytium/common/
sudo  find . -type f -exec sed -i 's/mirrors.tuna.tsinghua.edu.cn/mirrors.ustc.edu.cn/g' {} +
Note:这个步骤不是必选步骤,以个人经验,建议替换。
(3) 镜像编译
a)编译配置
sudo cd xxx/phytium-pi-os  //进入到PIOS的根目录
sudo ./support/kconfig/merge_config.sh configs/phytiumpi_defconfig configs/openamp_standalone.config
b)编译
sudo make
Note:编译时间比较长,大概需要10几个小时
(4) 编译结果查看
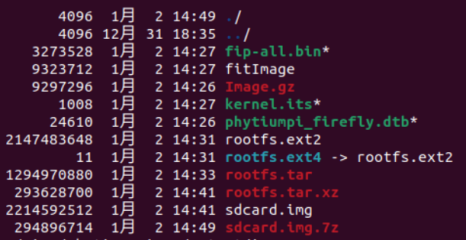
a)查看 image
文件位置:phytium-pi-os/output/images/
b)查看设备树节点reserved-memory(openAMP必须)
文件位置:phytium-pi-os/output/build/linux-kernel-6.6_v3.1/arch/arm64/boot/dts/phytium/
pe220x.dtsi
/{......   //根路径
reserved-memory {
                #address-cells = <0x2>;
                #size-cells = <0x2>;
                ranges;
                rproc0: rproc0@b0100000 {
                        no-map;
                        reg = <0x0 0xb0100000 0x0 x19900000>;
                };
        };
......}
c)查看设备树节点homo_rproc(openAMP必须)
目录位置:phytium-pi-os/output/build/linux-kernel-6.6_v3.1/arch/arm64/boot/dts/phytium
pe220x.dtsi
/{......
soc: soc{......   //soc目录
homo_rproc: homo_rproc@0 {
                        compatible = "homo,rproc";
                        status = "disabled";
                        homo_core0: homo_core0@b0100000 {
                                compatible = "homo,rproc-core";
                                remote-processor = <3>;
                                inter-processor-interrupt = <9>;
                                memory-region = <&rproc0>;
                                firmware-name = "openamp_core0.elf";
                        };
......}
......}
phytiumpi_firefly.dts
&homo_rproc {
        status = "okay";
};
4.上电启动PIOSV2.1
(1) 烧录SD卡
用Win32DiskImager烧录软件把编译好的sdcard.img镜像烧录到microSD卡。
(2) 上电启动飞腾派
第一次启动会执行firstlogin,设置root用户密码、创建普通用户和设置固件。
注意设置硬件版本为v2,内存为4G。
(3) 查看openAMP的程序文件
a)从核固件openamp_core0.elf
root@phytiumpi:/lib/firmware# ll openamp_core0.elf
-rwxr-xr-x 1 root root 1561856 Jun  9  2025 openamp_core0.elf
b)应用demo程序rpmsg-demo-single
root@phytiumpi:/usr/bin# ll rpmsg-demo-single
-rwxr-xr-x 1 root root 13704 Jun  9  2025 rpmsg-demo-single
(4) 查看openAMP的设备树节点
1.reserved-memory节点
a)设备树在文件系统的原始信息
路径: /sys/firmware/devicetree/base/reserved-memory/
.属性文件信息
hexdump -C \#address-cells
00000000  00 00 00 02
hexdump -C \#size-cells
00000000  00 00 00 02
cat name
reserved-memory
cd rproc0@b0100000/
cat name
rporc0
hexdump -C  phandle
00000000  00 00 00 12
hexdump -C  reg
00000000  00 00 00 00 b0 10 00 00  00 00 00 00 19 90 00 00
b)内核保留内存映射信息
root@phytiumpi:/proc# grep -i reserved iomem
  80000000-8000ffff : reserved
  81430000-8173ffff : reserved
b0100000-c99fffff : reserved
  e5c00000-f9bfffff : reserved
  f9c29000-f9c2ffff : reserved
  207b140000-207f7fffff : reserved
  207f855000-207f855fff : reserved
  207f856000-207f8adfff : reserved
  207f8b0000-207f8b2fff : reserved
  207f8b3000-207f8b3fff : reserved
  207f8b4000-207f8c8fff : reserved
  207f8c9000-207f8ecfff : reserved
  207f8ed000-207fffffff : reserved
2.homo_rproc节点
a)设备树在文件系统的原始信息
主远程处理器节点
路径:/sys/firmware/devicetree/base/soc/homo_rproc@0/
compatible:"homo,rproc"
status:"okay"
核心处理器节点:
路径:
/sys/firmware/devicetree/base/soc/homo_rproc@0/homo_core0@b0100000/
compatible:"homo,rproc-core"
remote-processor:<3>
inter-processor-interrupt:<9>
memory-region:指向 rproc0 的 phandle(0x12)
firmware-name:"openamp_core0.elf"

b)查看/sys
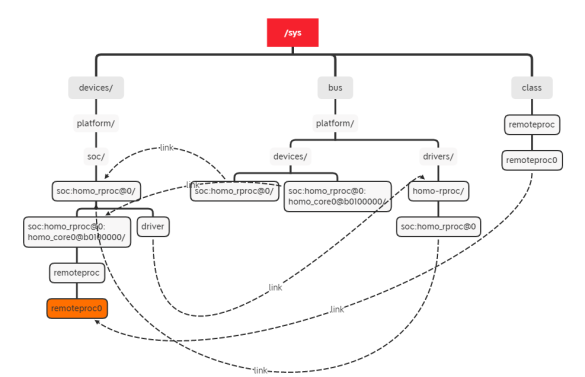
remoteproc0设备文件
关键文件	value	备注
name	homo_core0	设备名称
state	offline	.远程处理器状态控制:stop/start
.状态值offline/suspended/running/crashed
firmware	openamp_core0.elf	实时修改固件文件名:
echo new_firmware.elf > /sys/class/remoteproc/remoteproc0/firmware
dev	249:0	字符设备设备号

c)查看字符设备
 ll /dev/remoteproc0
crw------- 1 root root 249, 0 Jun  9 17:53 /dev/remoteproc0
5. DEMO验证openAMP
(1) start远程处理器
a)echo start > /sys/class/remoteproc/remoteproc0/state
I/TC: Secondary CPU 3 initializingoc
I/TC: Secondary CPU 3 switching to normal world boot
complier data: Jun  9 2025 ,time: 22:50:54
openamp lib version: v2021.10 (Major: 1, Minor: 1, Patch: 0)
libmetal lib version: 0 (Major: 1, Minor: 0, Patch: 0)
cpu1:    SLAVE_00:Starting application...
cpu1:    PHYTIUM_RPROC_MAIN:current 1
cpu1:    PHYTIUM_RPROC_MAIN:irq_vect is 9
cpu1:    SLAVE_00:Setup resource tables for the created remoteproc instances is over
cpu1:    FT_PLAT_INFO_MAIN:da is 0xc0300000 ~ 0xc0400000
cpu1:    SLAVE_00:Setup shared memory regions for both remoteproc instances is over
cpu1:    FT_PLAT_INFO_MAIN:share_mem_pa is 0xc0300000
cpu1:    FT_PLAT_INFO_MAIN:initializing rpmsg vdev
cpu1:    SLAVE_00:Try to create rpmsg endpoint.
cpu1:    SLAVE_00:Successfully created rpmsg endpoint.
b) 查看state状态
root@phytiumpi:/sys/class/remoteproc/remoteproc0# cat state
running
c)查看设备rpmsg_ctrl0
root@phytiumpi:/dev# ll rpmsg_ctrl0
crw------- 1 root root 236, 0 Jun 10 04:41 rpmsg_ctrl0
d)查看sysfs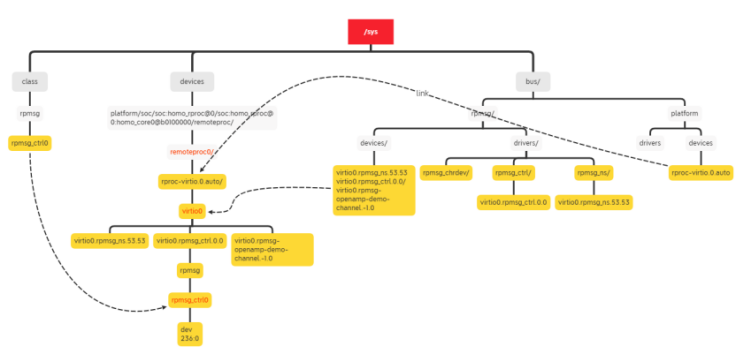
(2) 绑定通道设备的驱动
cd /sys/bus/rpmsg/devices/virtio0.rpmsg-openamp-demo-channel.-1.0
sudo echo rpmsg_chrdev > driver_override
(3) 执行rpmsg-demo-single
 a)安装位置/usr/bin
rpmsg-demo-single
argc: 1
Argument 0: rpmsg-demo-scpu1:    SLAVE_00:src:0x0
cpu1:    SLAVE_00:command:0x3,length:17.
ingle
received message: Hello World! No:1P���
cpu1:    SLAVE_00:src:0x0
cpu1:    SLAVE_00:command:0x3,length:17.
received message: Hello World! No:2
......
cpu1:    SLAVE_00:src:0x0
cpu1:    SLAVE_00:command:0x3,length:18.
received message: Hello World! No:99
cpu1:    SLAVE_00:src:0x0
cpu1:    SLAVE_00:command:0x3,length:19.
received message: Hello World! No:100
b)查看通道
root@phytiumpi:/dev# ll rp*
crw------- 1 root root 237, 0 Jun 10 10:33 rpmsg0
crw------- 1 root root 236, 0 Jun 10 04:41 rpmsg_ctrl0
c)查看/sys
(4) restart远程处理器
  a)stop远程处理器程序运行
rpmsg-demo-single stop 0
argc: 3
Argument 0: rpmsg-demo-singlcpu1:    SLAVE_00:src:0x0
cpu1:    SLAVE_00:command:0x2,length:1.
cpu1:    SLAVE_00:Stopping application...
cpu1:    PHYTIUM_RPROC_MAIN:Start to remove.
cpu1:    SLAVE_00:Slave shutdown.

Argument 1: stop
Argument 2: 0
want to stop 0
b) stop远程处理器
echo stop > /sys/class/remoteproc/remoteproc0/state
I/TC: Secondary CPU 3 initializing
I/TC: Secondary CPU 3 switching to normal world boot
c)查看是否回到原始状态
/dev
rpmsg_ctrl0 rpmsg0被删除
remoteproc0的状态
remoteproc0# cat state
offline
/sys
回到系统初始化状态
c)可以重新启动远程处理器了
        echo start > /sys/class/remoteproc/remoteproc0/state
6. 常见问题与解决办法
本章节中编译问题会比较多,列举一些常见编译问题。
(1) 下载太慢或者出错
【问题现象】
I: Retrieving InRelease
I: Retrieving Release
E: Failed getting release file
 https://mirrors.tuna.tsinghua.edu.cn/debian/dists/bullseye/Release
installing for second-stage ...
chroot: failed to run command '/debootstrap/debootstrap': No such file or directory
************
debootstrap failed in second-stage
  Please running the below commands before re-compiling:
    rm -rf /root/phytium-pi-os/output/build/skeleton-custom
    make skeleton-custom-dirclean
  Or
    make skeleton-custom-dirclean O=<output dir>
make: *** [package/pkg-generic.mk:292: /root/phytium-pi-os/output/build/skeleton-custom/.stamp_built] Error 1
【问题原因】
一般情况下apt的source比较慢或者网络连接不好
【解决方案】
清华源更换为中科大源
board/phytium/common/post-custom-skeleton-ubuntu.sh
board/phytium/common/ubuntu-package-installer
board/phytium/common/post-custom-skeleton-debian-11.sh
board/phytium/common/debian-package-installer
中的mirrors.tuna.tsinghua.edu.cn改为mirrors.ustc.edu.cn
命令举例
cd phytium-pi-os/board/phytium/common
find . -type f -exec sed -i 's/mirrors.tuna.tsinghua.edu.cn/mirrors.ustc.edu.cn/g' {} +
(2) 空间不够
【问题现象】
/root/phytium-pi-os/output/host/bin/aarch64-none-linux-gnu-ld: final link failed: No space left on device
make[1]: *** [Makefile:1207: vmlinux] Error 1
make[1]: Leaving directory '/root/phytium-pi-os/output/build/linux-kernel-5.10_v2.2'
make: *** [package/pkg-generic.mk:292: /root/phytium-pi-os/output/build/linux-kernel-5.10_v2.2/.stamp_built] Error 2
【问题原因】
磁盘空间不够了
(3) 文件访问权限
【问题现象】
ERROR: Permission denied while trying to create directory
 ERROR: unable to set uid/gid for user 'buildroot' in file
ERROR: Failed to acquire lock on /path/to/shared/buildroot/.lock (Permission denied)
【问题原因】
权限问题:共享文件夹通常具有特定的权限设置,这些权限可能与 Buildroot 构建过程中的需求不匹配。
文件系统限制:共享文件夹所在的文件系统可能与本地文件系统不同,这可能导致一些文件系统特性的行为不同。
路径问题:共享文件夹的路径可能包含特殊字符或格式。
【解决措施】
本地构建目录:将 Buildroot 源代码和输出目录放在本机的文件系统中(如 Ext4、XFS 等),确保您对该目录具有读写执行权限。
开发环境目录不要放在共享目录,许多共享文件系统对文件权限、所有权和访问控制列表(ACL)的支持存在局限
使用sudo或者root权限。
7.参考资料链接
飞腾派开发板资料下载www.iceasy.com/cloud/Phytium