开源社区
开源社区
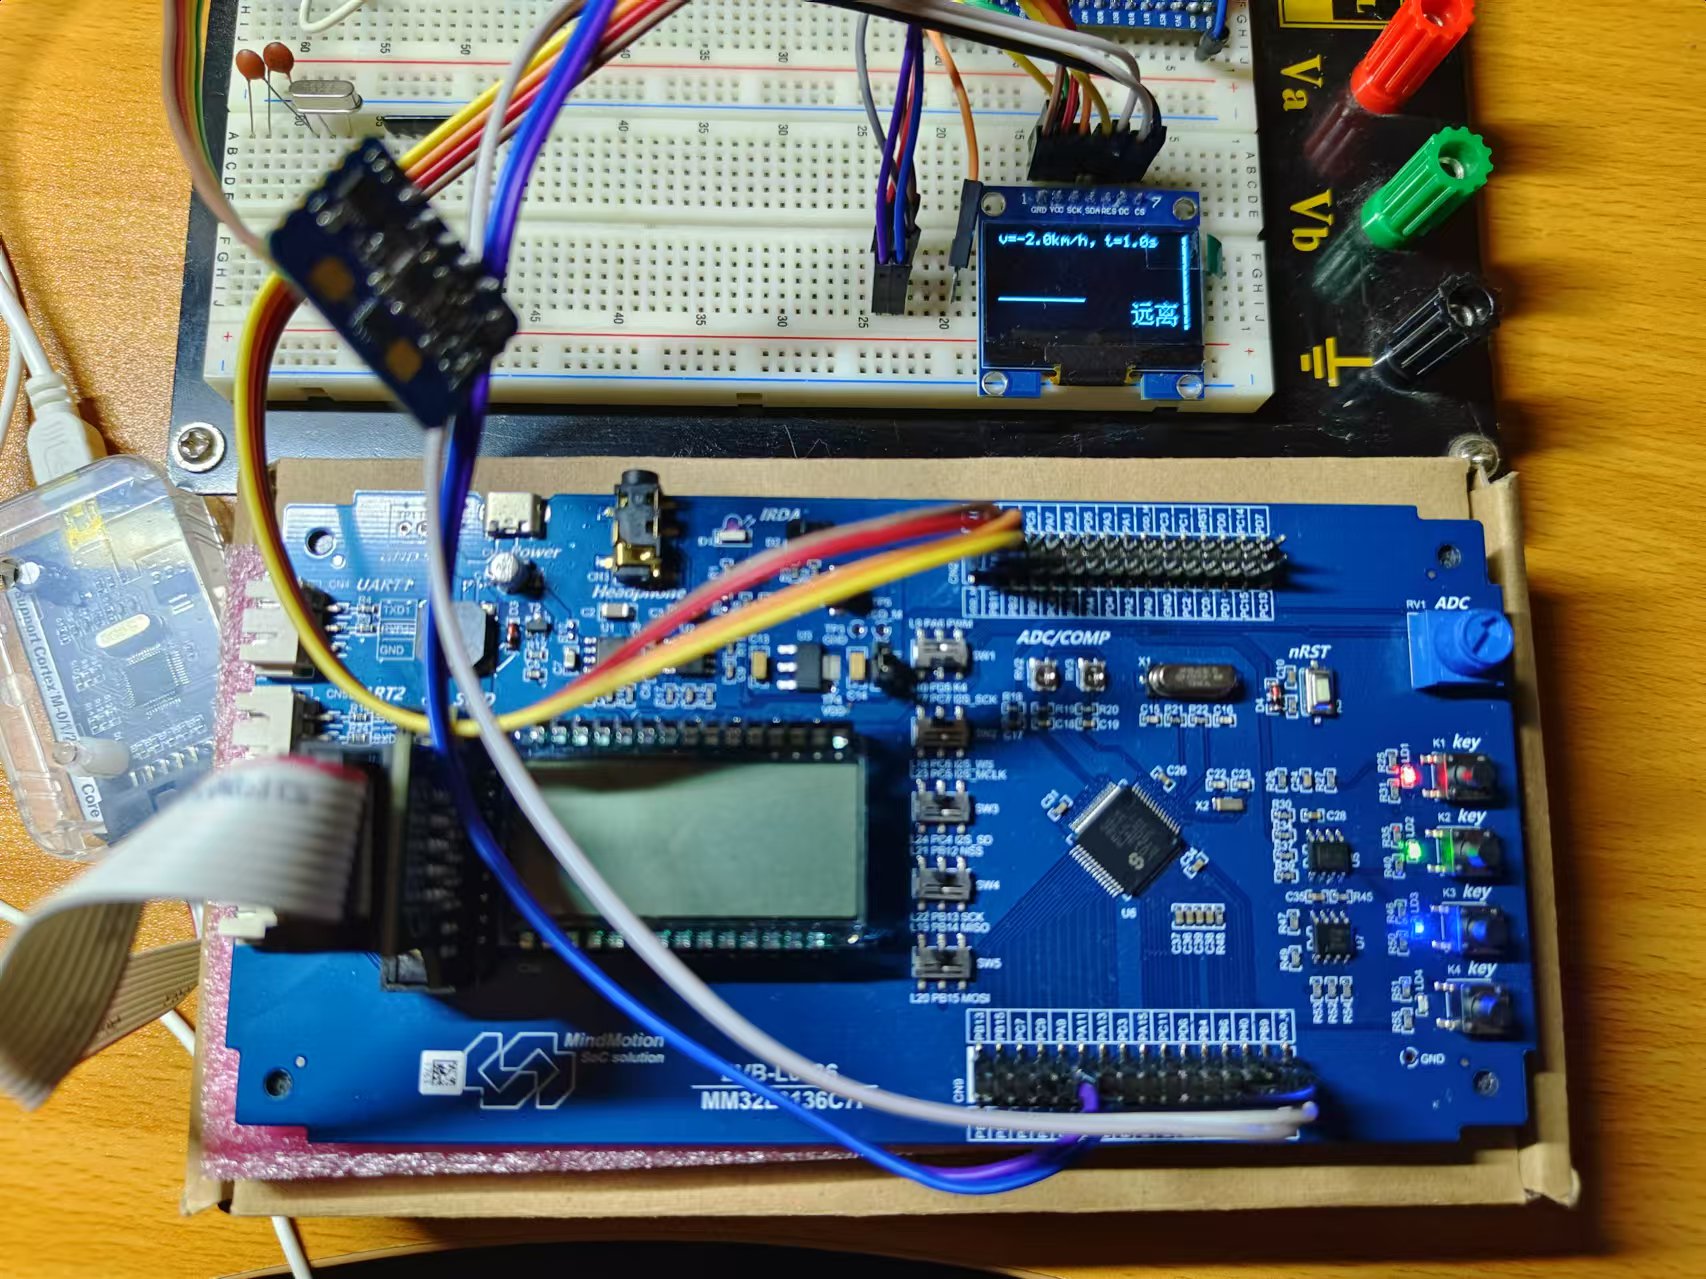
串口接收 CEM5826-M11 毫米波雷达数据,在 OLED 屏幕上绘制速度折线图并根据速度数据判断人体靠近或远离状态
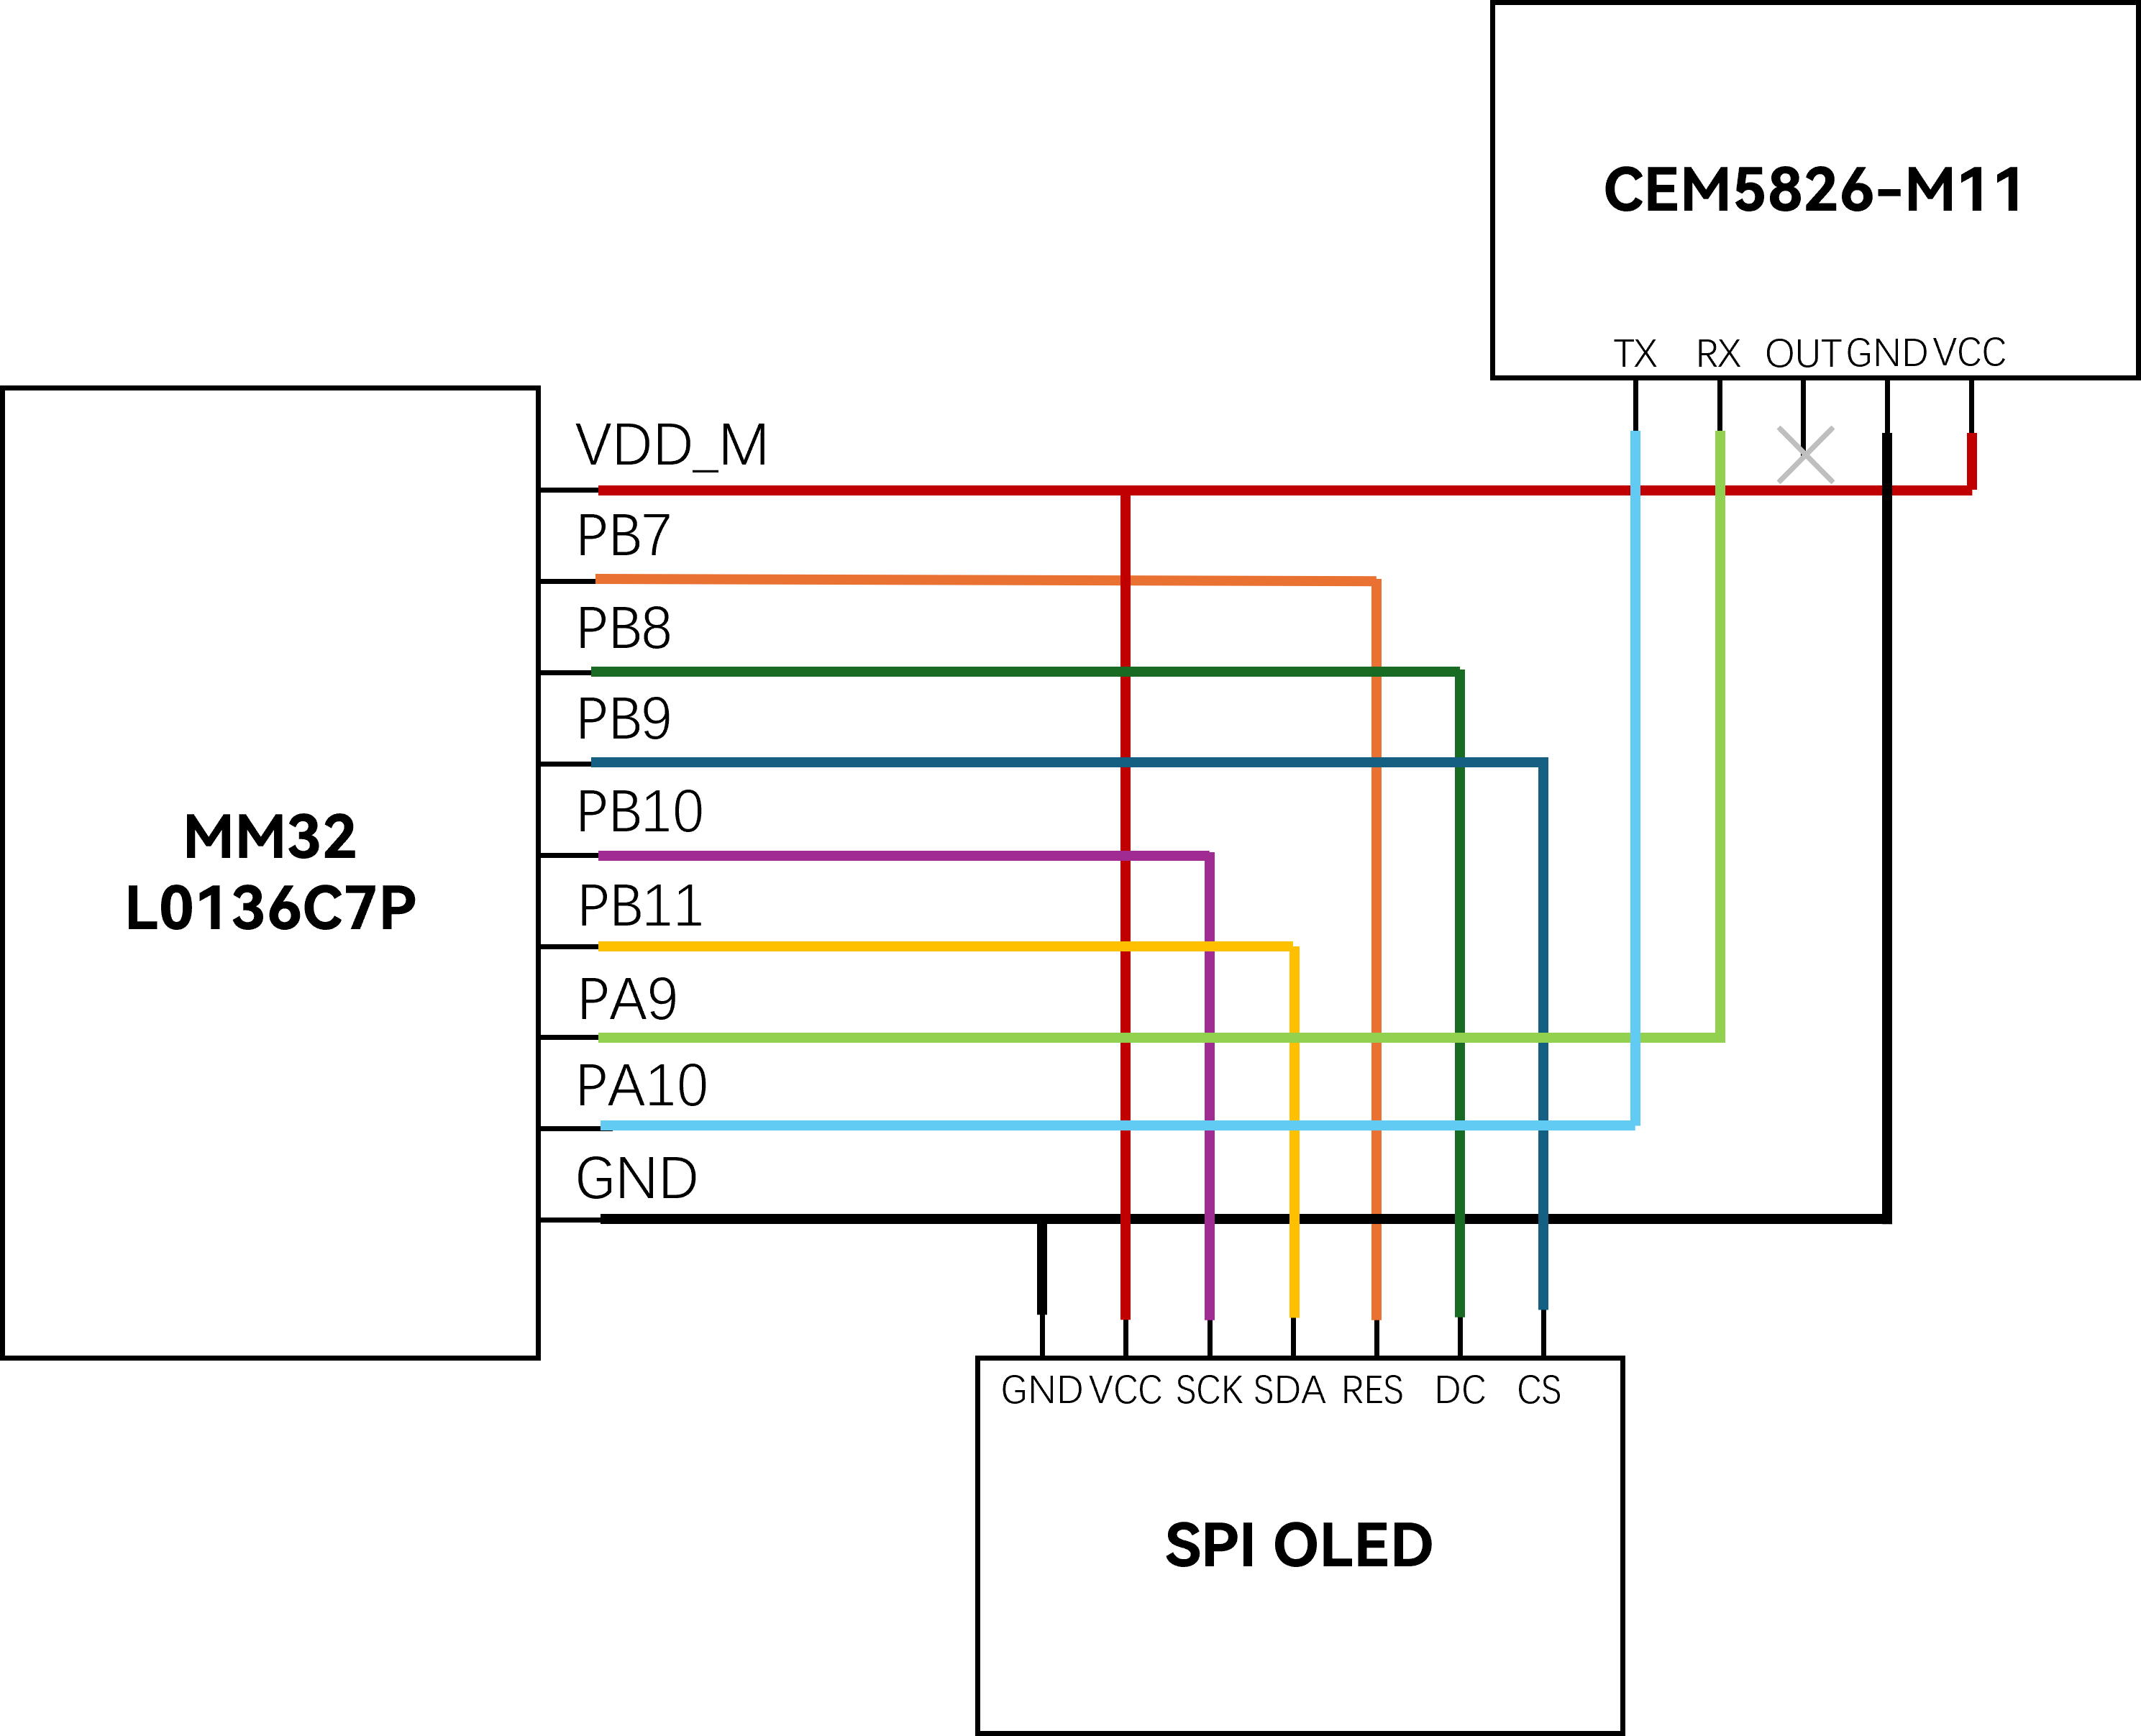
接线图
开发环境配置
开发环境配置方法可参考《MM32:配置开发环境和点亮第一颗LED》
程序编写
本项目自 STM32 项目移植而来
串口接收程序 usart.c
需要特别注意的:MM32中串口相关均为UART,这与STM32的USART不同!
void uart_init(u32 bound)
初始化串口1
void uart_init(u32 bound){
    // 初始化结构体
    GPIO_InitTypeDef GPIO_InitStructure;
    UART_InitTypeDef UART_InitStructure;
    NVIC_InitTypeDef NVIC_InitStructure;

    // 启用串口1的RCC时钟
    RCC_APB2PeriphClockCmd(RCC_APB2Periph_UART1, ENABLE);

    // 初始化串口
    // 按照CEM5826的文档设置串口:波特率115200,8位数据位,1位停止位,校验位和流控为None
    UART_StructInit(&UART_InitStructure);
    UART_InitStructure.BaudRate = bound;
    UART_InitStructure.WordLength = UART_WordLength_8b;
    UART_InitStructure.StopBits = UART_StopBits_1;
    UART_InitStructure.Parity = UART_Parity_No;
    UART_InitStructure.HWFlowControl = UART_HWFlowControl_None;
    UART_InitStructure.Mode = UART_Mode_Rx | UART_Mode_Tx;

    UART_Init(UART1, &UART_InitStructure);

    // 启用GPIOA的RCC时钟
    RCC_AHBPeriphClockCmd(RCC_AHBPeriph_GPIOA, ENABLE);

    GPIO_PinAFConfig(GPIOA, GPIO_PinSource9, GPIO_AF_1);
    GPIO_PinAFConfig(GPIOA, GPIO_PinSource10, GPIO_AF_1);

    //UART1_TX   PA9
    GPIO_StructInit(&GPIO_InitStructure);
    GPIO_InitStructure.GPIO_Pin = GPIO_Pin_9;
    GPIO_InitStructure.GPIO_Speed = GPIO_Speed_High;
    GPIO_InitStructure.GPIO_Mode = GPIO_Mode_AF_PP;
    GPIO_Init(GPIOA, &GPIO_InitStructure);
    //UART1_RX      PA10
    GPIO_StructInit(&GPIO_InitStructure);
    GPIO_InitStructure.GPIO_Pin = GPIO_Pin_10;
    GPIO_InitStructure.GPIO_Mode = GPIO_Mode_IPU;
    GPIO_Init(GPIOA, &GPIO_InitStructure);

    // 抢占优先级
    NVIC_InitStructure.NVIC_IRQChannel = UART1_IRQn;
    NVIC_InitStructure.NVIC_IRQChannelPriority = 0x01;
    NVIC_InitStructure.NVIC_IRQChannelCmd = ENABLE;
    NVIC_Init(&NVIC_InitStructure);

    UART_ITConfig(UART1, UART_IT_RX, ENABLE);
    UART_Cmd(UART1, ENABLE);

}
void UART1_IRQHandler(void)
接收数据,将数据缓存在 USART_RX_BUF 中
void UART1_IRQHandler(void)
{
    u8 Res;
    if(UART_GetITStatus(UART1, UART_IT_RX) != RESET)
    {
        Res = UART_ReceiveData(UART1);

        if((USART_RX_STA & 0x8000) == 0)
        {
            if(USART_RX_STA & 0x4000)
            {
                if(Res != 0x0a) USART_RX_STA = 0;
                else USART_RX_STA |= 0x8000;
            }
            else
            {
                if(Res == 0x0d) USART_RX_STA |= 0x4000;
                else
                {
                    USART_RX_BUF[USART_RX_STA & 0X3FFF] = Res ;
                    USART_RX_STA++;
                    if(USART_RX_STA > (USART_REC_LEN - 1)) USART_RX_STA = 0;
                }
            }
        }
    }
}
SPI OLED 库 oled.c
void OLED_Init(void)
OLED 初始化
void OLED_Init(void)
{
    // 初始化结构体
    GPIO_InitTypeDef  GPIO_InitStructure;

    // 启用RCC时钟
     RCC_AHBPeriphClockCmd(RCC_AHBPeriph_GPIOB, ENABLE);

    // 启用GPIO口,推挽输出模式、高速
    // PB10 ---- SCL
    // PB11 ---- SDA
    // PB7  ---- RES
    // PB8  ---- DC
    // PB9  ---- CS
    GPIO_InitStructure.GPIO_Pin = GPIO_Pin_10|GPIO_Pin_11|GPIO_Pin_7|GPIO_Pin_8|GPIO_Pin_9;
     GPIO_InitStructure.GPIO_Mode = GPIO_Mode_Out_PP;
    GPIO_InitStructure.GPIO_Speed = GPIO_Speed_High;
     GPIO_Init(GPIOB, &GPIO_InitStructure);
     GPIO_SetBits(GPIOB,GPIO_Pin_10|GPIO_Pin_11|GPIO_Pin_7|GPIO_Pin_8|GPIO_Pin_9);

    // ...
    // OLED 初始化命令
    // ...
}
主程序 main.c
void main(void)
int main(void)
{
    // 初始化
    int i = 0, j = 0, str;
    float v, vData[20];
    char temp[USART_REC_LEN], showStr[20];

    delay_init();
    uart_init(115200);
    OLED_Init();

    OLED_Coloiurn(0);       // 关闭反色显示(0-正常, 1-反色)
    OLED_DisplayTurn(0);    // 关闭翻转显示(0-正常, 1-翻转)

    // 显示 iCEasy LOGO
    OLED_ShowPicture(0, 0, 128, 64, BMP1, 1);
    OLED_Refresh();
    delay_ms(500);

    OLED_Clear();

    while(1)
    {
        // 将串口收到的数据缓存到 temp
        if(USART_RX_STA != 0)
        {
            for(i = 0; i < USART_REC_LEN; i++)
                temp[i] = USART_RX_BUF[i];
        }

        // 从收到的数据中提取速度和强度
        sscanf(temp, "v=%f km/h, str=%d", &v, &str);

        // 将速度存入数组
        vData[j] = v;

        // 画图
        if(j > 0)
            OLED_DrawLine((j - 1) * 6, 40 - (vData[j - 1]*5) / 2, j * 6, 40 - (vData[j]*5) / 2, 1);

        // 在 OLED 上显示字符串
        sprintf(showStr, "v=%.1fkm/h, t=%.1fs ", vData[j], 0.1*j);

        OLED_ShowString(2, 0, showStr, 8, 1);

        // 判断远离或靠近
        if(v > 0)
        {
            OLED_ShowChinese(92,46,0,16,1);
            OLED_ShowChinese(108,46,1,16,1);
        }
        else
        {
            OLED_ShowChinese(92,46,2,16,1);
            OLED_ShowChinese(108,46,3,16,1);
        }

        OLED_Refresh();

        // 恢复继续接收串口数据
        USART_RX_STA = 0;
        for(i = 0; i < USART_REC_LEN; i++)
            USART_RX_BUF[i] = 0;

        delay_ms(100);
        if(j++ == 20){ j = 0; OLED_Clear(); }

    }
}
一些图片