开源社区
开源社区
【昉·星光2 RISC-V 单板计算机】人脸识别
本文介绍了昉·星光2单板计算机实现 人脸识别 的板端推理的项目设计。
人脸识别
基于 Haar 特征的级联分类器进行目标检测是 Paul Viola 和 Michael Jones 在2001年发表的论文《Rapid Object Detection using a Boosted Cascade of Simple Features》中提出的一种有效的目标检测方法。
Haar Cascade 基于机器学习,由大量的正负样本图像训练级联函数,用于检测其他图像中的对象。
详见:Rapid object detection using a boosted cascade of simple features | IEEE Conference Publication | IEEE Xplore .
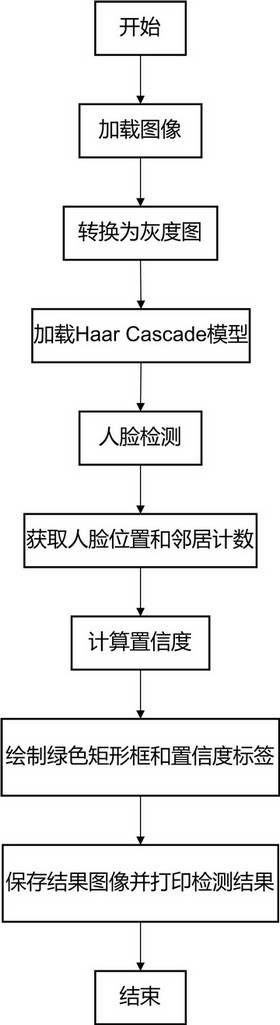
流程图
代码
调用本地 haarcascades 的人脸识别 XML 文件,默认路径为
/usr/share/opencv4/haarcascades/haarcascade_frontalface_default.xml 实现人脸识别的板端推理。
import cv2
import argparse
import os
import numpy as np
def detect_faces(image_path, cascade_path="/usr/share/opencv4/haarcascades/haarcascade_frontalface_default.xml"):
"""
Detect faces in an image using Haar Cascade.
Parameters:
image_path: Path to the input image.
cascade_path: Path to the Haar Cascade model file.
"""
# Check if the files exist
if not os.path.isfile(image_path):
print(f"Error: The image file {image_path} does not exist!")
return
if not os.path.isfile(cascade_path):
print(f"Error: The cascade file {cascade_path} does not exist!")
print("Please download it from OpenCV's GitHub: https://github.com/opencv/opencv/tree/master/data/haarcascades")
return
# Load the image
image = cv2.imread(image_path)
if image is None:
print(f"Error: Unable to load the image {image_path}")
return
# Convert to grayscale (face detection is usually performed on grayscale images)
gray = cv2.cvtColor(image, cv2.COLOR_BGR2GRAY)
# Load the Haar Cascade classifier
face_cascade = cv2.CascadeClassifier(cascade_path)
# Detect faces
faces, _, weights = face_cascade.detectMultiScale3(
gray,
scaleFactor=1.1,
minNeighbors=5,
minSize=(30, 30),
outputRejectLevels=True
)
print(f"Detected {len(faces)} faces")
# Draw green rectangles around detected faces and label them with "confidence"
for i, (x, y, w, h) in enumerate(faces):
# Calculate "pseudo-confidence" (normalized neighbor count to the range 0-1)
pseudo_confidence = min(weights[i] / 20.0, 1.0) # Assuming maximum neighbor count is 20
# Draw a green rectangle (in BGR format)
color = (0, 255, 0) # green
thickness = 2
cv2.rectangle(image, (x, y), (x+w, y+h), color, thickness)
# Display "confidence" above the rectangle
label = f"{pseudo_confidence:.2f}"
font = cv2.FONT_HERSHEY_SIMPLEX
font_scale = 0.6
text_size = cv2.getTextSize(label, font, font_scale, thickness)[0]
# Ensure the text does not go out of the image boundaries
text_x = min(x, image.shape[1] - text_size[0] - 5)
text_y = max(y - 5, text_size[1] + 5)
# Draw a background for the text
'''
cv2.rectangle(image,
(text_x, text_y - text_size[1] - 5),
(text_x + text_size[0], text_y + 5),
color, -1) # fill the rectangle
'''
# Draw the text
cv2.putText(image, label,
(text_x, text_y),
font, font_scale,
(0, 255, 0), # color text
thickness, cv2.LINE_AA)
# Save the result
output_path = "output_" + os.path.basename(image_path)
cv2.imwrite(output_path, image)
print(f"The result has been saved to {output_path}")
# If you have a graphical interface, you can uncomment the following lines to display the image
# cv2.imshow("Face Detection Result", image)
# cv2.waitKey(0)
# cv2.destroyAllWindows()
if __name__ == "__main__":
# Set up command-line argument parsing
parser = argparse.ArgumentParser(description='Detect faces in an image using Haar Cascade')
parser.add_argument('image_path', type=str, help='Path to the input image')
parser.add_argument('--cascade', type=str, default="/usr/share/opencv4/haarcascades/haarcascade_frontalface_default.xml",
help='Path to the Haar Cascade model file (default is haarcascade_frontalface_default.xml in the current directory)')
args = parser.parse_args()
# Perform face detection
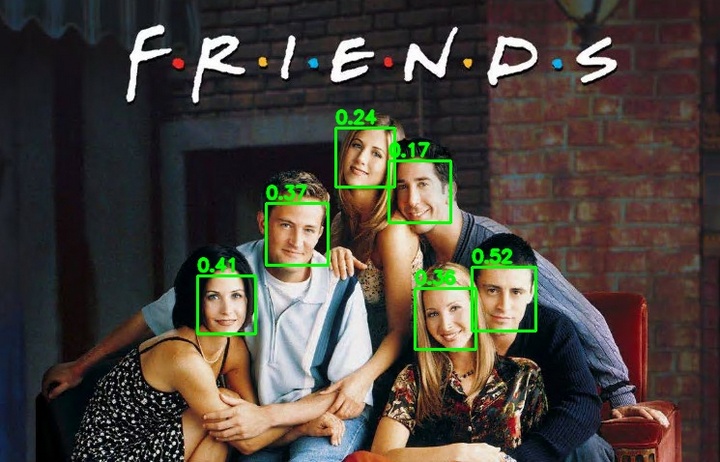
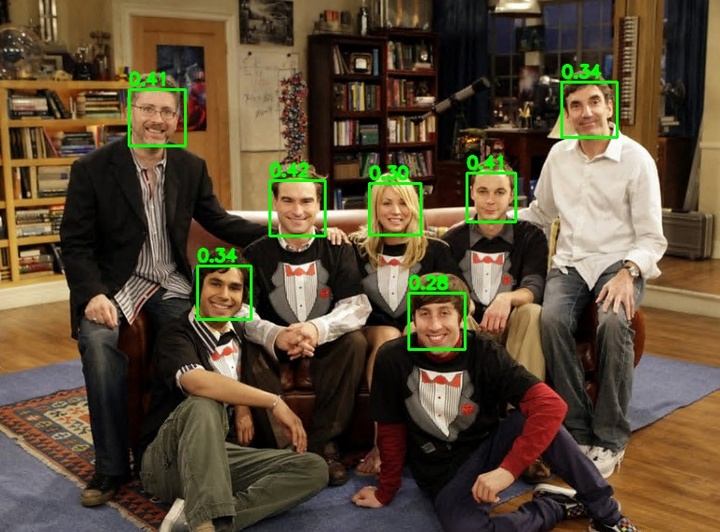
detect_faces(args.image_path, args.cascade)保存代码,终端执行指令 python3 face_detection.py test.jpg 运行识别程序;
终端输出检测结果和保存路径

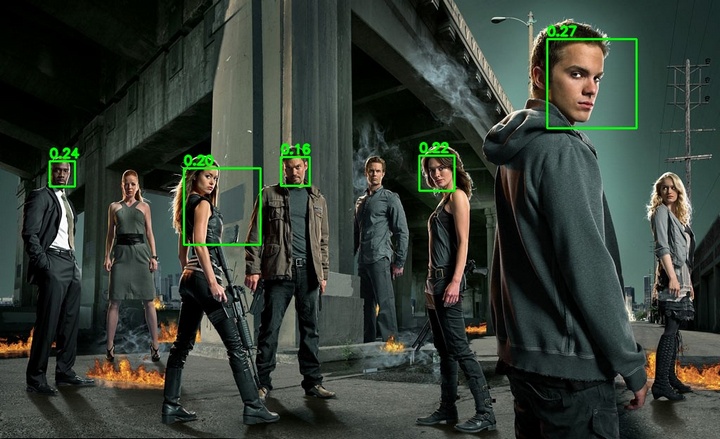
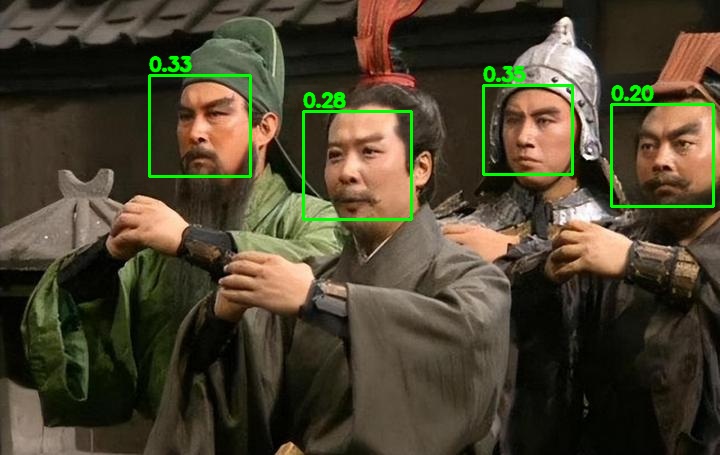
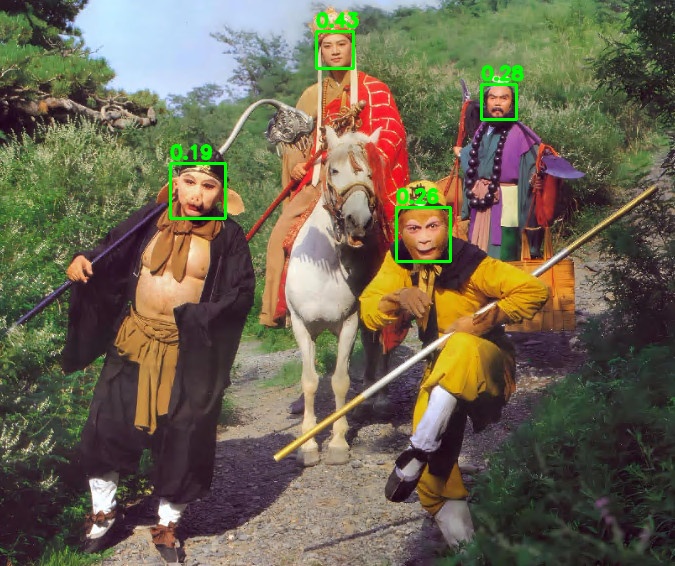
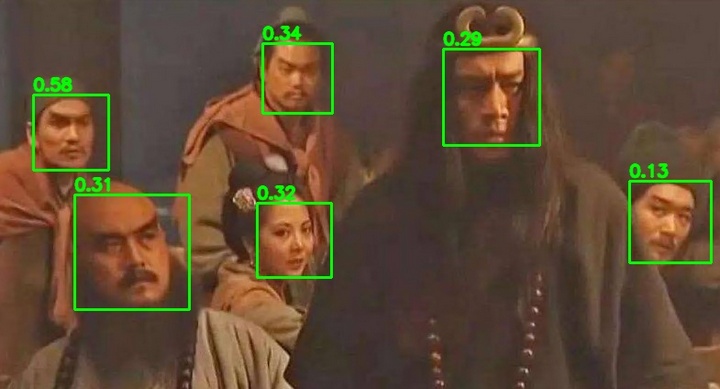
效果

总结
本文介绍了昉·星光2单板计算机实现 人脸识别 的项目设计,为该开发板在人工智能领域的应用和快速开发提供了参考。