开源社区
开源社区

一、GD32VW553-IOT V2 介绍
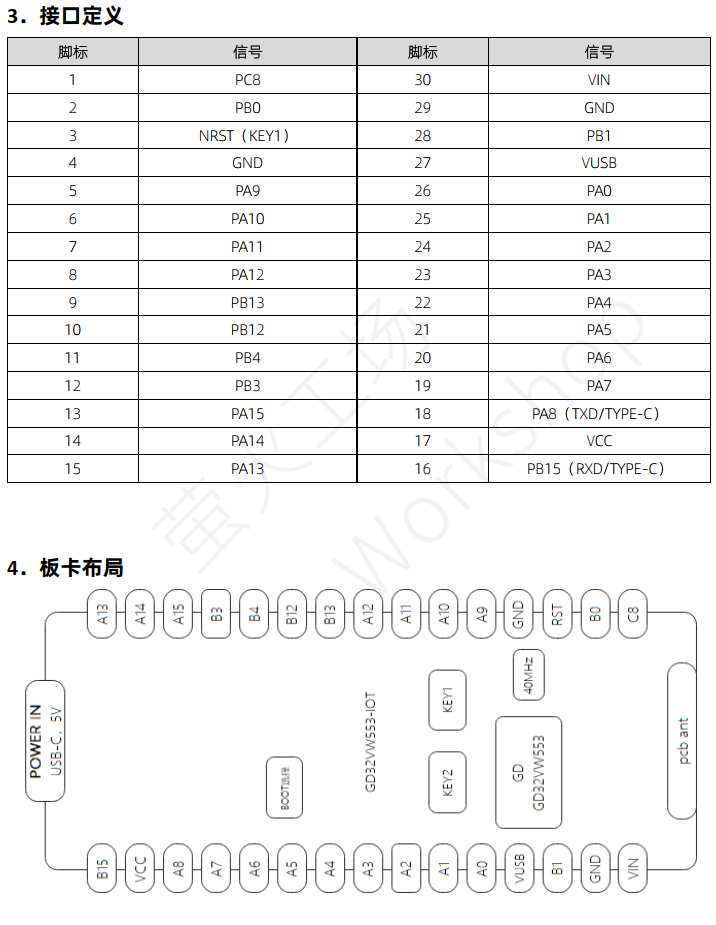
1. GD32VW553-IOT V2在前一版GD32VW553-IOT 的基础上进行了较大幅度的改进,包括自带下载串口、新增引脚丝印、使用拨码开关替代跳线帽等。
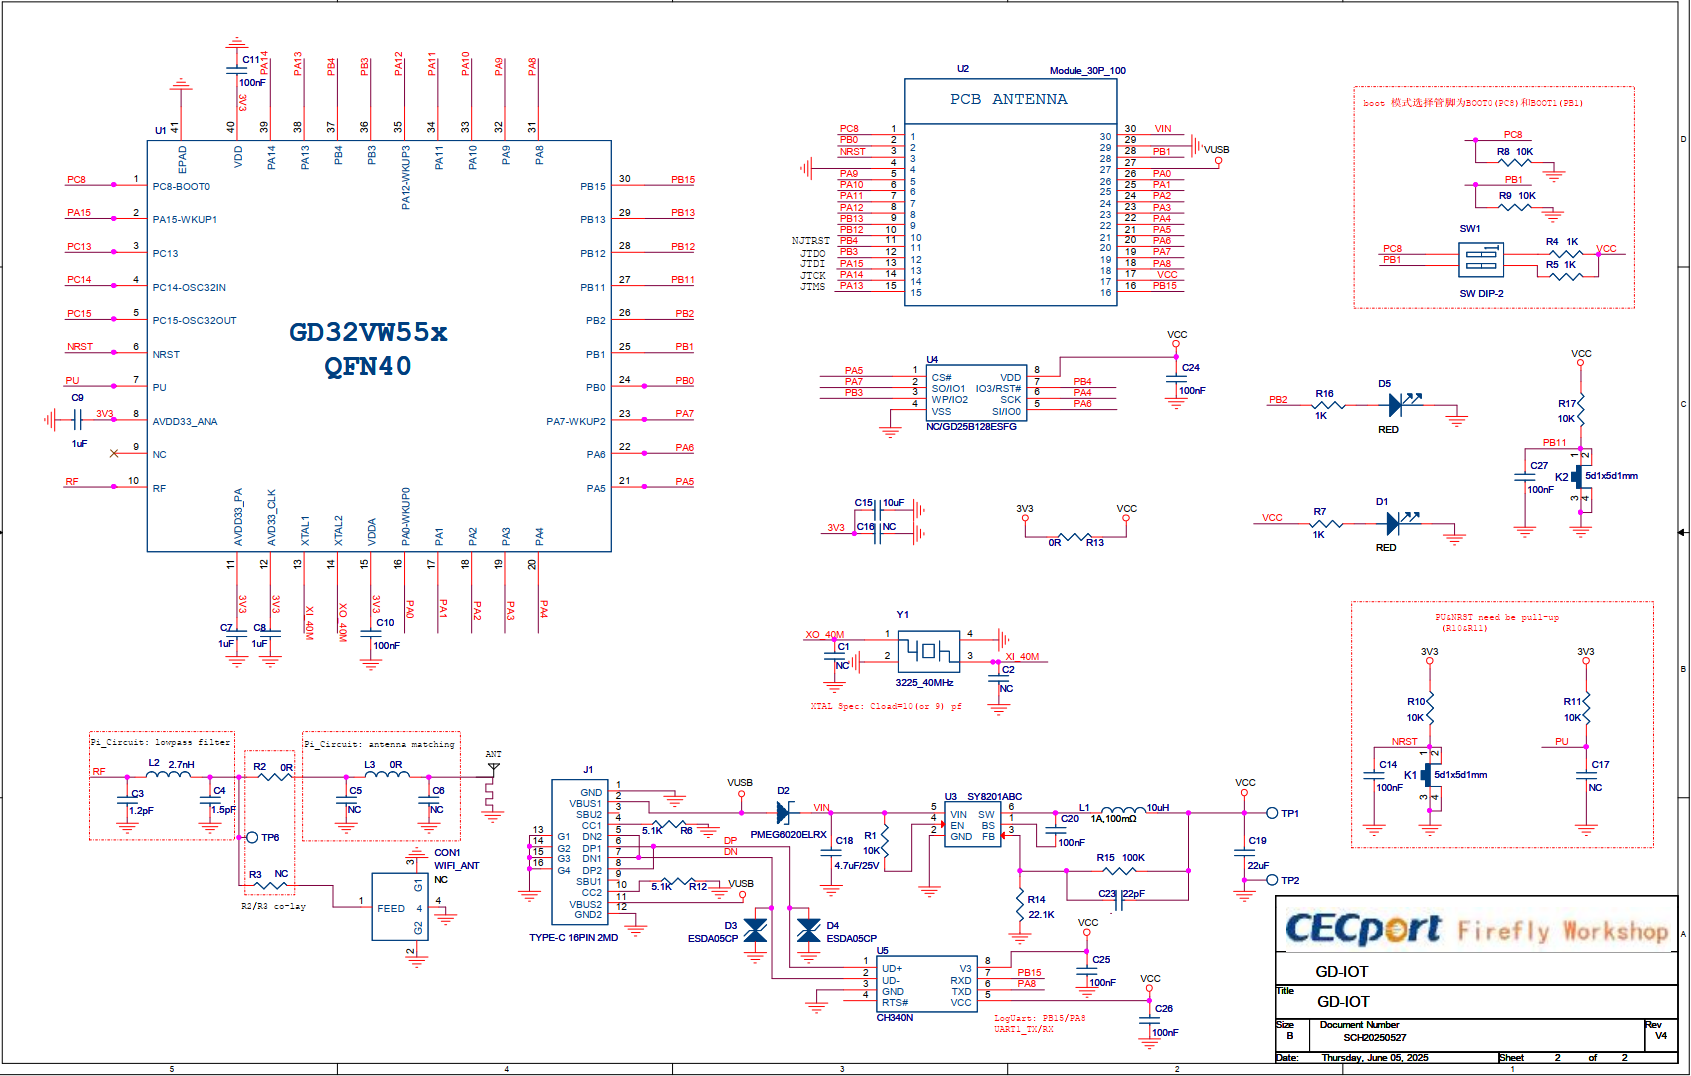
1. 设计图
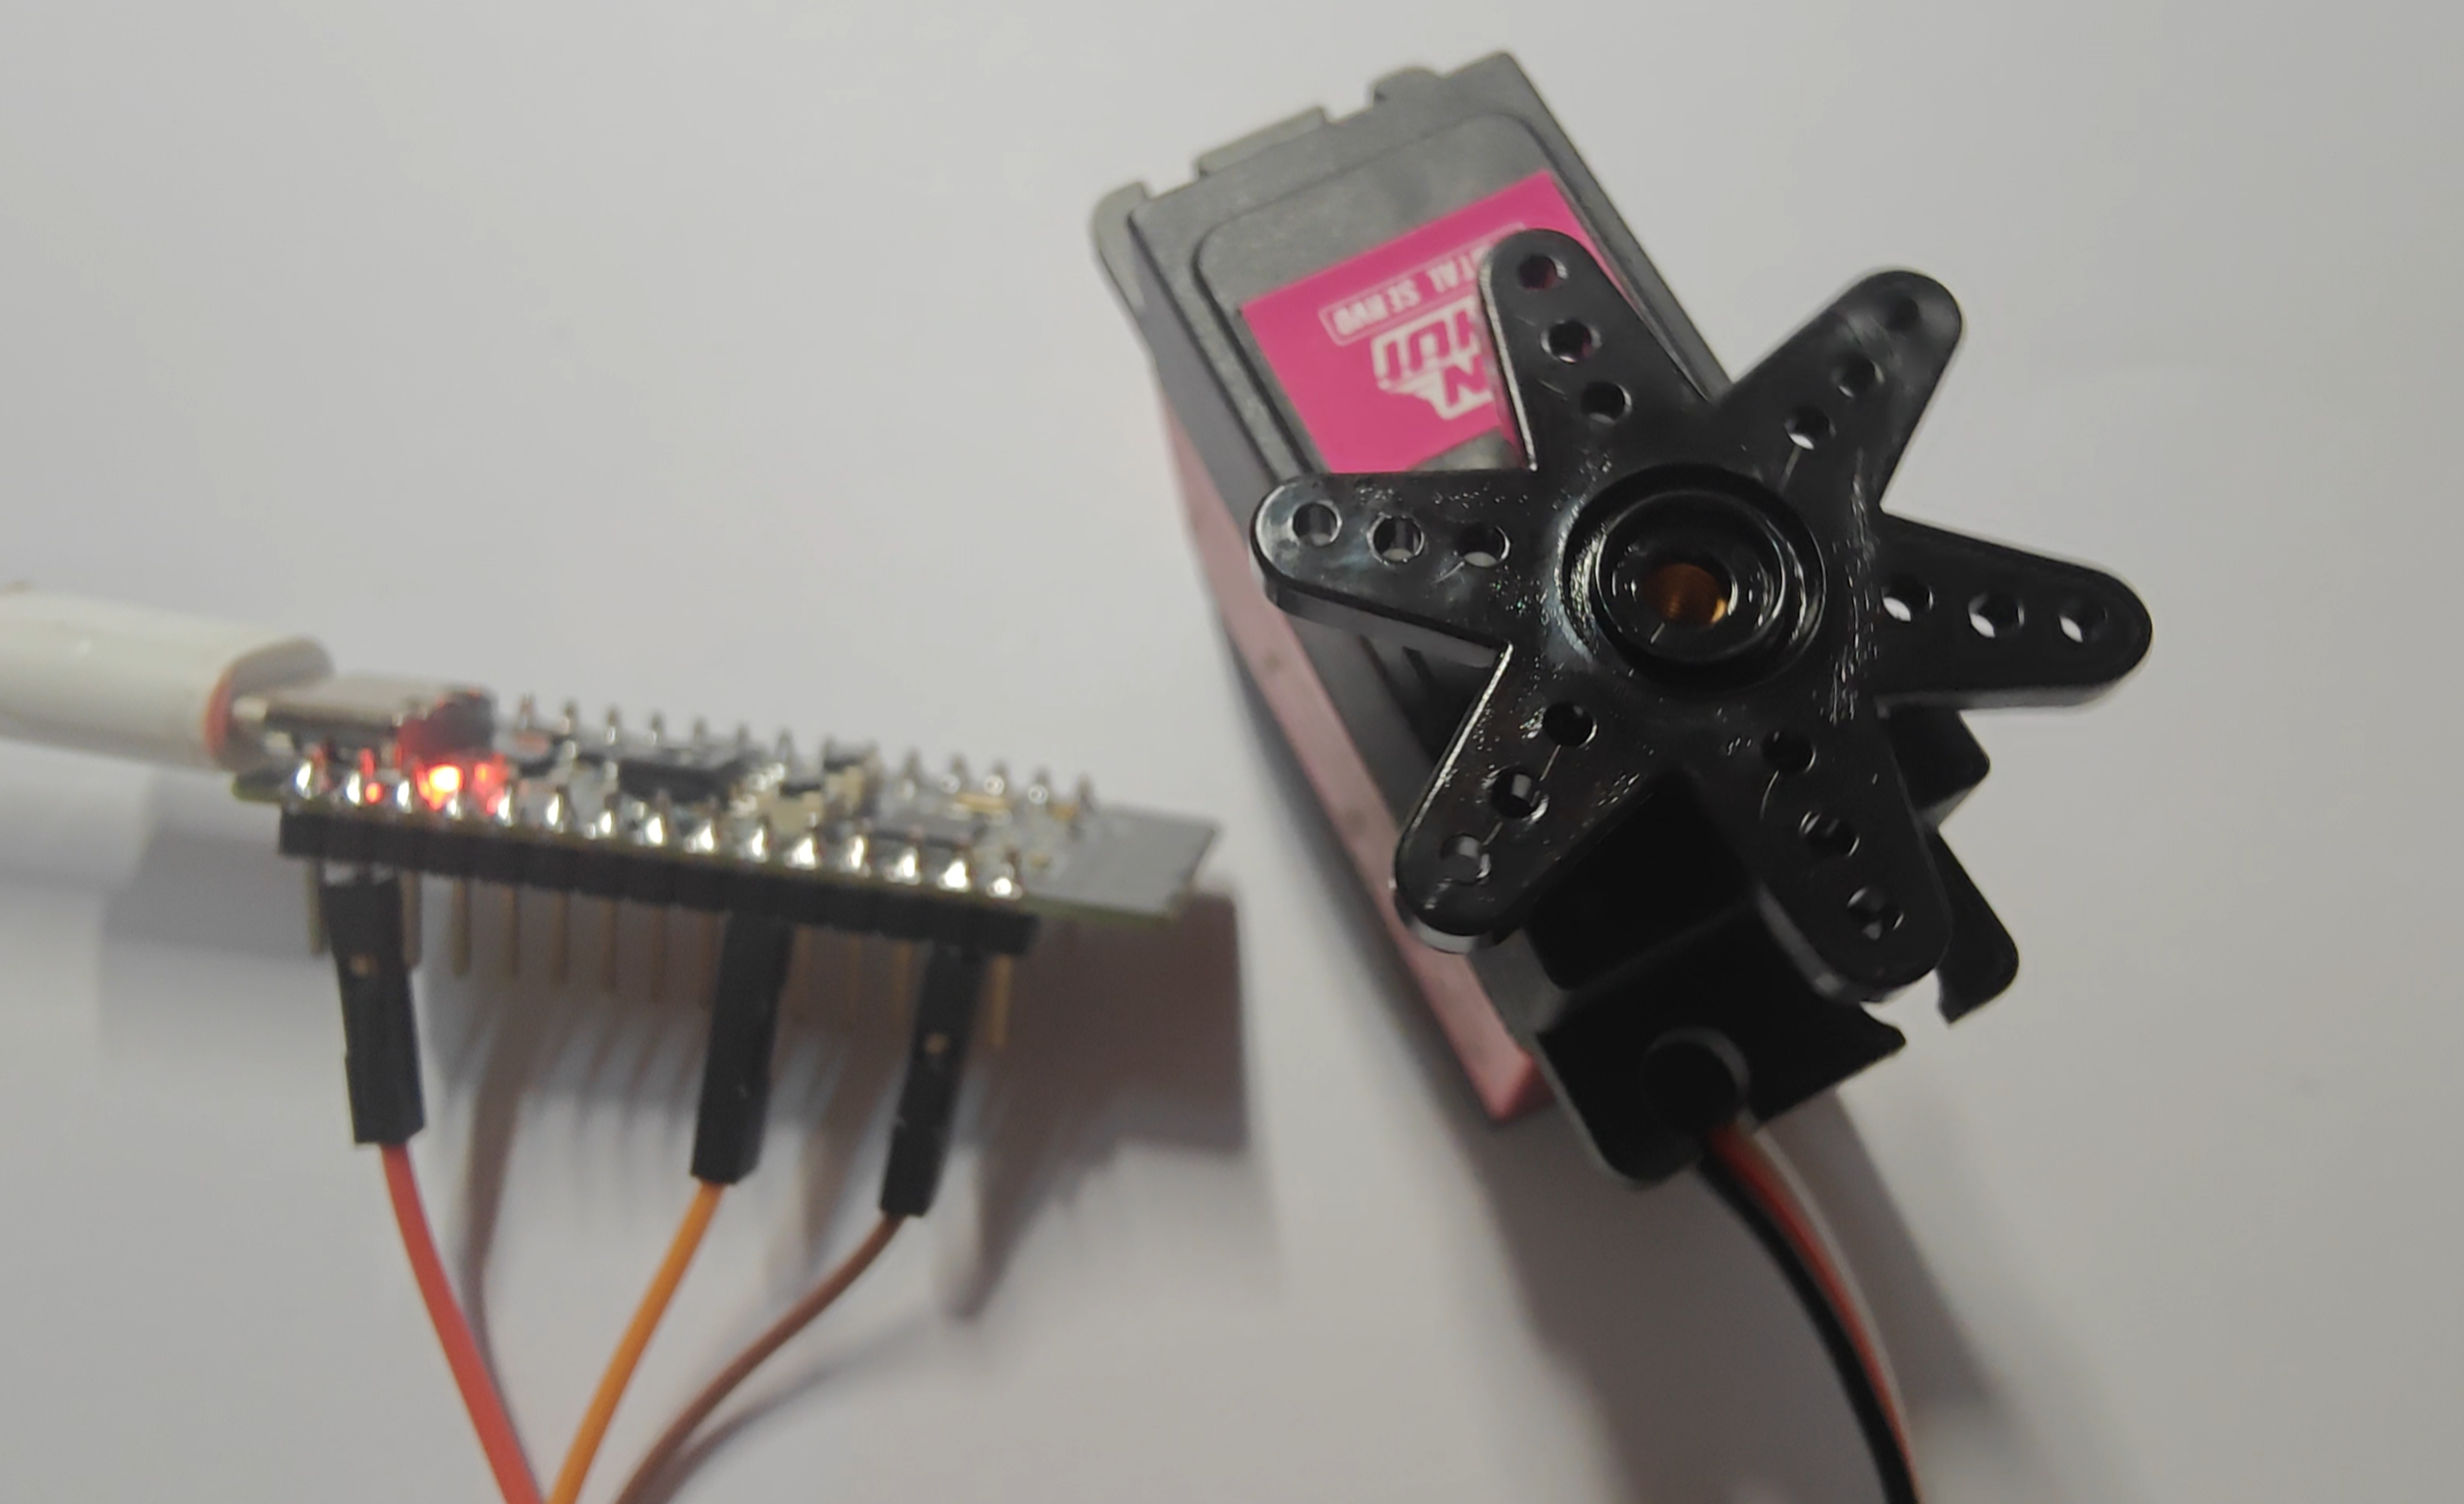
二、GD32VW553-IOT V2 驱动舵机
代码部分
#include "gd32vw55x.h"
#include "systick.h"
#include <stdio.h>
#include "main.h"
#include "gd32vw553h_eval.h"

#include "bsp_sg90.h"

/*!
    \brief      toggle the led every 500ms
    \param[in]  none
    \param[out] none
    \retval     none
*/
void led_spark(void)
{
    static __IO uint32_t timingdelaylocal = 0U;

    if(timingdelaylocal) {

        if(timingdelaylocal < 500U) {
            gd_eval_led_on(LED1);
        } else {
            gd_eval_led_off(LED1);
        }

        timingdelaylocal--;
    } else {
        timingdelaylocal = 1000U;
    }
}

/*!
    \brief      main function
    \param[in]  none
    \param[out] none
    \retval     none
*/
int main(void)
{
#ifdef __FIRMWARE_VERSION_DEFINE
    uint32_t fw_ver = 0;
#endif /* __FIRMWARE_VERSION_DEFINE */

    /* configure systick */
    systick_config();
    eclic_priority_group_set(ECLIC_PRIGROUP_LEVEL3_PRIO1);
    /* initilize the LEDs, USART and key */
    gd_eval_led_init(LED1);
    gd_eval_com_init(EVAL_COM0);
    gd_eval_key_init(KEY_TAMPER_WAKEUP, KEY_MODE_GPIO);

#ifdef __FIRMWARE_VERSION_DEFINE
    fw_ver = gd32vw55x_firmware_version_get();
    printf("\r\n= = = = = = = = = = = = = = = = = = = = = = = = = = = = = = = =\r\n\n");
    printf("\r\n=== Welcome to use the LC-GD32VW553-HMQ6 development board ====\r\n\n");
    printf("\r\n= = = = = = = = = = = = = = = = = = = = = = = = = = = = = = = =\r\n");
    /* print firmware version */
    printf("\r\nGD32VW55X series firmware version: V%d.%d.%d", (uint8_t)(fw_ver >> 24), (uint8_t)(fw_ver >> 16), (uint8_t)(fw_ver >> 8));
#endif /* __FIRMWARE_VERSION_DEFINE */

    /* print out the clock frequency of system, AHB, APB1 and APB2 */
    printf("\r\nCK_SYS is %d\r\n", rcu_clock_freq_get(CK_SYS));
    printf("\r\nCK_AHB is %d\r\n", rcu_clock_freq_get(CK_AHB));
    printf("\r\nCK_APB1 is %d\r\n", rcu_clock_freq_get(CK_APB1));
    printf("\r\nCK_APB2 is %d\r\n", rcu_clock_freq_get(CK_APB2));

    uint8_t i = 0;

    SG90_Init();
    printf("\r\nSG90 Init Success\r\n");

    /* 先让舵机转到最大角度位置,等待1000ms */
    Set_SG90_Servo_Angle(180);
    delay_1ms(1000);
    /* 再让舵机转到最小角度位置,等待1000ms */
    Set_SG90_Servo_Angle(0);
    delay_1ms(1000);
    printf("\r\nSG90 Set Angle Success\r\n");

    while(1)
    {
        Set_SG90_Servo_Angle(i);
        i=i+30;
        if( i >= 180 )
        {
            i = 0;
        }
        delay_1ms(500);
    }
}
#include "bsp_sg90.h"

uint8_t Servo_Angle = 0;   //舵机角度

/******************************************************************
   配置占空比 范围 0 ~ (per-1)
   t = 0.5ms-------------------舵机会转动 0 °
   t = 1.0ms-------------------舵机会转动 45°
   t = 1.5ms-------------------舵机会转动 90°
   t = 2.0ms-------------------舵机会转动 135°
   t = 2.5ms-------------------舵机会转动180°
******************************************************************/
/******************************************************************
 * 函 数 名 称:Set_SG90_Servo_Angle
 * 函 数 说 明:设置角度
 * 函 数 形 参:angle=要设置的角度,范围0-180
 * 函 数 返 回:无
******************************************************************/
void Set_SG90_Servo_Angle(uint32_t angle)
{
    if(angle > 180)
    {
        angle = 180; // 限制角度在0到180度之间
    }

    Servo_Angle = angle;

    // 计算PWM占空比
    // 0.5ms对应的计数 ~= 500
    // 2.5ms对应的计数 ~= 2500
    float min_count = 500.0f;
    float max_count = 2500.0f;
    float range = max_count - min_count;
    float ServoAngle = min_count + (((float)angle / 180.0f) * range);

    timer_channel_output_pulse_value_config(BSP_PWM_TIMER, BSP_PWM_TIMER_CH, (uint32_t)ServoAngle);
}

/******************************************************************
 * 函 数 名 称:读取当前角度
 * 函 数 说 明:Get_SG90_Servo_Angle
 * 函 数 形 参:无
 * 函 数 返 回:当前角度
 * 备       注:使用前必须确保之前使用过
                Set_SG90_Servo_Angle
                函数设置过角度
******************************************************************/
uint8_t Get_SG90_Servo_Angle(void)
{
    return Servo_Angle;
}

/******************************************************************
 * 函 数 名 称:SG90_Init
 * 函 数 说 明:SG90舵机初始化
 * 函 数 形 参:无
 * 函 数 返 回:无
******************************************************************/
void SG90_Init(void)
{
    /* 使能相关时钟 */
    Module_RCU_Enable();

    gpio_mode_set(BSP_PWM_PORT, GPIO_MODE_AF, GPIO_PUPD_NONE, BSP_PWM_PIN);
    gpio_output_options_set(BSP_PWM_PORT,GPIO_OTYPE_PP, GPIO_OSPEED_25MHZ,BSP_PWM_PIN);
    /* 配置IO为定时器的通道 */
    gpio_af_set(BSP_PWM_PORT, BSP_PWM_AF, BSP_PWM_PIN);

    timer_parameter_struct  timer_initpara; // 定义定时器结构体

    /* 开启时钟 */
    rcu_periph_clock_enable(BSP_PWM_TIMER_RCU); // 开启定时器时钟
    /* CK_TIMERx = 2 x CK_APB1  = 2x80M = 160MHZ */
    rcu_timer_clock_prescaler_config(RCU_TIMER_PSC_MUL2); // 配置定时器时钟
    timer_deinit(BSP_PWM_TIMER); // 复位定时器

    /* 配置定时器参数 */
    timer_initpara.prescaler = 160-1;                     // 时钟预分频值  PSC_CLK= 160MHZ / 160 = 1MHZ
    timer_initpara.alignedmode = TIMER_COUNTER_EDGE;      // 边缘对齐
    timer_initpara.counterdirection = TIMER_COUNTER_UP;   // 向上计数
    timer_initpara.period = 20000 -1;                     // 周期   T = 20000  T-time = 20ms  f = 50HZ
    /* 在输入捕获的时候使用  数字滤波器使用的采样频率之间的分频比例 */
    timer_initpara.clockdivision = TIMER_CKDIV_DIV1;      // 分频因子
    /* 只有高级定时器才有。配置为x,就重复x+1次进入中断 */
    timer_initpara.repetitioncounter = 0;                 // 重复计数器 0-255
    timer_init(BSP_PWM_TIMER,&timer_initpara);            // 初始化定时器

    /* 使能定时器 */
    timer_enable(BSP_PWM_TIMER);

    /* 定义定时器输出参数 */
    timer_oc_parameter_struct timer_ocintpara;
    timer_ocintpara.ocpolarity  = TIMER_OC_POLARITY_HIGH;          // 输出极性为高
    timer_ocintpara.outputstate = TIMER_CCX_ENABLE;                // 使能输出

    /* 配置定时器输出功能 */
    timer_channel_output_config(BSP_PWM_TIMER, BSP_PWM_TIMER_CH, &timer_ocintpara);

    /* 配置定时器通道输出脉冲值 */
    timer_channel_output_pulse_value_config(BSP_PWM_TIMER,BSP_PWM_TIMER_CH, 0);

    /* 配置定时器通道输出比较模式 */
    timer_channel_output_mode_config(BSP_PWM_TIMER,BSP_PWM_TIMER_CH,TIMER_OC_MODE_PWM0);

    /* 配置定时器通道输出影子寄存器 */
    timer_channel_output_shadow_config(BSP_PWM_TIMER,BSP_PWM_TIMER_CH,TIMER_OC_SHADOW_DISABLE);

    /* 使能自动重载影子寄存器 */
    timer_auto_reload_shadow_enable(BSP_PWM_TIMER);
}