
 开源社区
开源社区 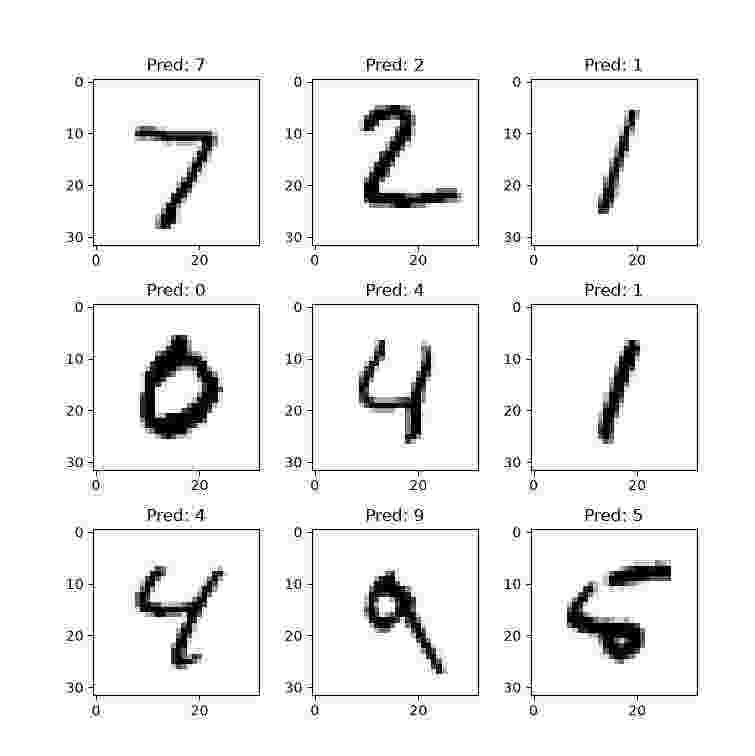
1. 环境准备
为了在飞腾派PRO上部署深度学习模型,我们一般需要完成两个方面的工作:1)获得并训练模型 2)部署模型。为了保持过程的一致性,本文选用Google TensorFlow作为深度学习框架,与Pytorch相比,TensorFlow拥有更深的深度学习工业基础,提供一系列的工具方便训练与部署。在主机端使用TensorFlow训练模型,使用TensorFlow Lite或者TensorFlow Micro将模型部署到边缘设备中进行推理。
1.1 安装Tensorflow
在PC端安装Tensorflow至少需要满足以下要求:
· Python 3.8-3.11
· Ubuntu 16.04 or later / Windows 10
· NVIDIA GPU Driver (如果需要GPU)
tensorflow从2.10开始不再原生Windows 支持NVIDIA GPU
由于作者常用机为Windows10,因此本文将介绍使用在Windows 10安装Tensorflow 2.10,Linux的安装请参考Tensorflow安装指南
安装MiniConda
Miniconda是Anaconda的简化版本,可以在系统创建一个隔离的Python开发环境,直接下载miniconda安装包,双击安装包即可安装。
创建conda环境
· 使用Win + x,唤起开始菜单,选择运行,键入pwsh,进入powershell。
· 进入miniconda安装位置,激活conda环境
| $ cd D:\miniconda\shell\condabin$ .\conda-hook.ps1$ conda activate base |
· 创建tf环境。注意:激活后,powershell命令行将带有base或tf环境前缀以指示当前conda环境
| (base) PS C:\Users> conda create --name tf python=3.9(base) PS C:\Users> conda activate tf(tf) PS C:\Users> |
安装cuda与cudnn
| (tf) PS C:\Users> conda install -c conda-forge cudatoolkit=11.2 cudnn=8.1.0 |
安装tensorflow并验证
| (tf) PS C:\Users> pip install --upgrade pip(tf) PS C:\Users> pip install "tensorflow<2.11" |
| (tf) PS C:\Users> python -c "import tensorflow as tf; print(tf.config.list_physical_devices('GPU'))"[PhysicalDevice(name='/physical_device:GPU:0', device_type='GPU')] |
1.2 安装Tensorflow lite
由于google已经提供基于Debian ARM64的tflite Linux aarch64 pip包,因此在飞腾派PRO上安装Tensorflow lite相对简单。
· 安装pip
| $ sudo apt install python3-pip |
· 安装tflite-runtime
| $ python3 -m pip install -U pip -i https://mirrors.cloud.tencent.com/pypi/simple$ python3 -m pip install tflite-runtime -i https://mirrors.cloud.tencent.com/pypi/simple |
2. 代码时间
2.1 训练LeNet模型
LeNet模型由Yann LeCun在1998年设计并提出的,是一种非常经典的卷积神经网络模型,先使用Tensorflow API实现这个模型。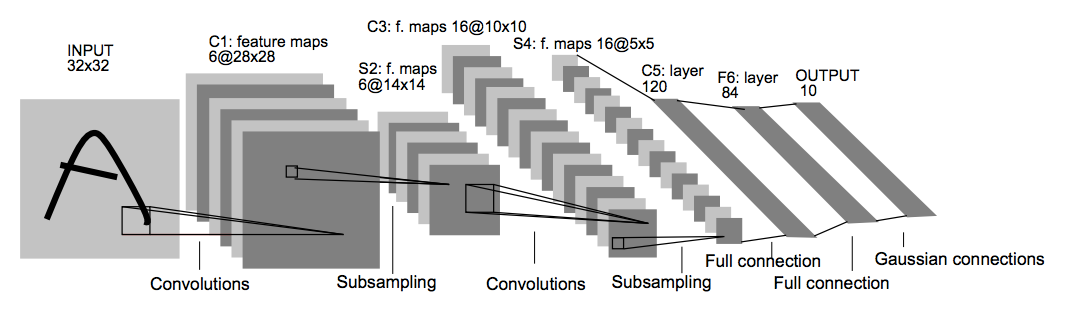
MNIST数据集可在此处下载,由于MNIST数据集图片大小为28x28,因此实际使用LeNet时,原数据需要填充至32x32
| def build_lenet_model(input_shape=(28, 28, 1), num_classes=10): """ 构建简化的 LeNet-5 模型结构 """ model = models.Sequential([ layers.Conv2D( input_shape=(32, 32, 1), filters=6, kernel_size=(3, 3), activation="relu" ), layers.AveragePooling2D(), layers.Conv2D(filters=16, kernel_size=(3, 3), activation="relu"), layers.AveragePooling2D(), layers.Flatten(), layers.Dense(units=120, activation="relu"), layers.Dense(units=84, activation="relu"), layers.Dense(units=10, activation="softmax"), ]) return model |
载入数据
| def read_mnist(images_path: str, labels_path: str): with gzip.open(labels_path, "rb") as labelsFile: labels = np.frombuffer(labelsFile.read(), dtype=np.uint8, offset=8) with gzip.open(images_path, "rb") as imagesFile: length = len(labels) # Load flat 28x28 px images (784 px), and convert them to 28x28 px features = ( np.frombuffer(imagesFile.read(), dtype=np.uint8, offset=16) .reshape(length, 784) .reshape(length, 28, 28, 1) ) # LeNet architecture accepts a 32x32 pixel images as input, # mnist data is 28x28 pixels. We simply pad the images with zeros to overcome features = np.pad(features, ((0, 0), (2, 2), (2, 2), (0, 0)), "constant") return features, labels |
设置损失函数以及优化器开始训练, 评估模型
| def train_model(): print("正在加载 MNIST 数据集...") x_train, y_train = read_mnist( "train-images-idx3-ubyte.gz", "train-labels-idx1-ubyte.gz" ) x_test, y_test = read_mnist("t10k-images-idx3-ubyte.gz", "t10k-labels-idx1-ubyte.gz") x_train, x_test = x_train / 255.0, x_test / 255.0 model = build_lenet_model() loss_fn = tf.keras.losses.SparseCategoricalCrossentropy(from_logits=False) model.compile(optimizer='adam', loss=loss_fn, metrics=['accuracy']) model.summary() print("开始训练模型...") history = model.fit(x_train, y_train, epochs=5) # 评估模型 test_loss, test_acc = model.evaluate(x_test, y_test, verbose=2) print(f'\n测试准确率: {test_acc * 100:.2f}%') # 保存原始 Keras 模型 model.save('lenet_mnist_model') #lenet_mnist.h5 print("Keras 模型已保存为 lenet_mnist_model") # lenet_mnist.h5 return model |
| 开始训练模型...Epoch 1/51875/1875 [==============================] - 7s 4ms/step - loss: 0.2186 - accuracy: 0.9353Epoch 2/51875/1875 [==============================] - 7s 4ms/step - loss: 0.0723 - accuracy: 0.9778Epoch 3/51875/1875 [==============================] - 7s 4ms/step - loss: 0.0534 - accuracy: 0.9833Epoch 4/51875/1875 [==============================] - 7s 4ms/step - loss: 0.0405 - accuracy: 0.9871Epoch 5/51875/1875 [==============================] - 7s 4ms/step - loss: 0.0346 - accuracy: 0.9890313/313 - 1s - loss: 0.0378 - accuracy: 0.9876 - 681ms/epoch - 2ms/step 测试准确率: 98.76% |
可以看到我们的LeNet模型在MNIST的识别准确度高达98.97%!
为了在飞腾派PRO中进行推理,还需要将模型导出为TFLite格式
| def convert_to_tflite(model): print("正在转换为 TensorFlow Lite 格式...") # 创建转换器 converter = tf.lite.TFLiteConverter.from_keras_model(model) # 启用动态范围量化以减小模型体积并加速推理 converter.optimizations = [tf.lite.Optimize.DEFAULT] try: tflite_model = converter.convert() except Exception as e: print(f"转换出错: {e}") # 如果量化失败,尝试不量化转换 converter.optimizations = [] tflite_model = converter.convert() # 保存 TFLite 模型 with open(' lenet5.tflite', 'wb') as f: f.write(tflite_model) print(f"TFLite 模型已保存,大小: {len(tflite_model) / 1024:.2f} KB") if __name__ == '__main__': # 执行训练 trained_model = train_model() # 执行转换 convert_to_tflite(trained_model) |
2.2 在飞腾派PRO部署LeNet模型
现在让我们教飞腾派PRO识别数字吧
首先设置track装饰器,让我们了解飞腾派PRO的推理速度
| import timeimport logging as logimport sys log.basicConfig(format='[ %(levelname)s ] %(message)s', level=log.INFO, stream=sys.stdout) def timer(label:str, ms_:bool=True): def out_wrapper(func): def wrapper(*args, **kwargs): st = time.perf_counter() ret = func(*args, **kwargs) measure = time.perf_counter() - st if ms_: measure *= 1e3 tag = "ms" if ms_ else "s" log.info(f"{label} elapsed {(measure):.3f} {tag}.") return ret return wrapper return out_wrapper |
推理函数:
| @timer("infer")def infer(model:str, input_blob:np.array) -> int: interpreter = tf.lite.Interpreter(model_path=model, num_threads=4) interpreter.allocate_tensors() input_details = interpreter.get_input_details() # Get input and output tensors. output_details = interpreter.get_output_details() interpreter.set_tensor(input_details[0]['index'], input_blob) interpreter.invoke() return np.argmax(interpreter.get_tensor(output_details[0]['index'])) |
完整代码如下:
| import gzipimport numpy as npimport matplotlib.pyplot as pltimport tensorflow as tf#import tflite_runtime.interpreter as tf from track import timer def read_mnist(images_path: str, labels_path: str): with gzip.open(labels_path, "rb") as labelsFile: labels = np.frombuffer(labelsFile.read(), dtype=np.uint8, offset=8) with gzip.open(images_path, "rb") as imagesFile: length = len(labels) # Load flat 28x28 px images (784 px), and convert them to 28x28 px features = ( np.frombuffer(imagesFile.read(), dtype=np.uint8, offset=16) .reshape(length, 784) .reshape(length, 28, 28, 1) ) # LeNet architecture accepts a 32x32 pixel images as input, # mnist data is 28x28 pixels. We simply pad the images with zeros to overcome features = np.pad(features, ((0, 0), (2, 2), (2, 2), (0, 0)), "constant") return features, labels @timer("infer")def infer(model:str, input_blob:np.array) -> int: interpreter = tf.lite.Interpreter(model_path=model, num_threads=4) interpreter.allocate_tensors() input_details = interpreter.get_input_details() # Get input and output tensors. output_details = interpreter.get_output_details() interpreter.set_tensor(input_details[0]['index'], input_blob) interpreter.invoke() return np.argmax(interpreter.get_tensor(output_details[0]['index'])) def display_grid(images): AUTO_RANGE = 100 AUTO_SIZE = 9 np.random.randint(AUTO_RANGE, size=AUTO_SIZE) figure = plt.figure(figsize=(8, 8)) figure.subplots_adjust(hspace=0.36) for i in range(AUTO_SIZE): image = images[i] input_blob = np.expand_dims(image, 0) pred = infer(model_path, input_blob) figure.add_subplot(3, 3, i+1) plt.grid(False) plt.title(f"Pred: {pred}") plt.imshow(image, cmap=plt.cm.gray_r) if __name__ == "__main__": model_path = r"lenet5.tflite" x_test, y_test = read_mnist("t10k-images-idx3-ubyte.gz", "t10k-labels-idx1-ubyte.gz") x_test = x_test / 255.0 x_test = np.float32(x_test) display_grid(x_test) plt.show() |
3. 运行结果
| INFO: Created TensorFlow Lite XNNPACK delegate for CPU.[ INFO ] infer elapsed 11.696 ms.[ INFO ] infer elapsed 1.654 ms.[ INFO ] infer elapsed 1.540 ms.[ INFO ] infer elapsed 1.497 ms.[ INFO ] infer elapsed 1.658 ms.[ INFO ] infer elapsed 1.664 ms.[ INFO ] infer elapsed 2.073 ms.[ INFO ] infer elapsed 1.352 ms.[ INFO ] infer elapsed 1.286 ms. |

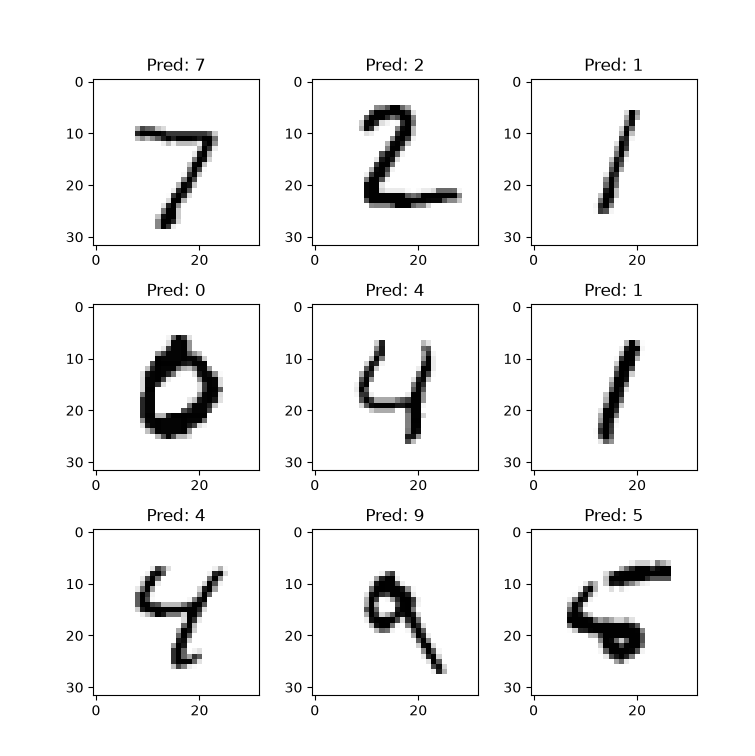
可以看到除第一次初始化需要一些时间,飞腾派PRO推理速度还是不错的